Remove Static Noise from Headphones – For all Platforms
by Simon
Have you heard hissing or buzzing sound from your headphones? Is there any static noise coming from your headphone? We are here to give some useful tips that can remove static noise from your headphones.
Getting a static noise from the headphones is the worst thing to happen. You might end up thinking your headphones are done for. I know; we all have been there. But, that's not always the case. It can be a hardware or software problem that you might solve using the following tips.
You might be wondering why your headphones started to produce strange static noise out of nowhere?
Contents
- Check the Headphone and Its Hardware First
- Remove Static Noise from Headphones on Windows PC
- Remove Static Noise from Headphones on Android Phones
- Remove Static Noise Issue from Headphones on an iPhone.
- How to Remove Static Noise from Headphones on a Mac
- How to Prevent your Headphones from Producing Static or Hissing Sound
- Conclusion
- Related Posts
The Faulty Wires, Jacks, Audio Ports, Headphones transducer, Environment, and uneven power consumption can make your headphones produce strange static or hissing noise. While on the software level, outdated drivers, misuse of audio settings, or buggy updates can also cause your headphones to make a static and hissing noise.
And, if you are thinking about how to remove the background hissing sound from your headphones? Here is a quick answer.
Start by checking the hardware of your headphones themselves. Clean your headphones, check their wires, jacks, and clean the ports. On the software level, restart your device, make sure your drivers are up to date.
After checking the hardware (curated below), you can skip to your platform to find tweaks that might help. We have covered software level fixes for IOS, Android, Windows, and Mac .
Check the Headphone and Its Hardware First
Many things make your headphone produce noise in the audio. You can start checking all the things mentioned below one-by-one to find the root cause of this problem. And, before jumping into the software level tweaks, you should check the hardware first. It saves you the trouble of changing the software settings if your headphone is faulty.
Following are the things that may be causing your headphone to produce static noise.
- Low-Quality Audio
- Cables and Jacks
- Port Issues
- Environment
- Static Noise in Wireless Headphones
- Faulty Headphone Driver Unit
- Amplifier or Sound Card
Low-Quality Audio
Are you new to experiencing static noise in your headphone? Then you should also check the audio itself. Try playing the same copy of audio on different headphones or speakers to see if the audio is good or not. You should implement this step as well. It will save you a lot of trouble if that's the problem.
Cables and Jacks of a Headphone
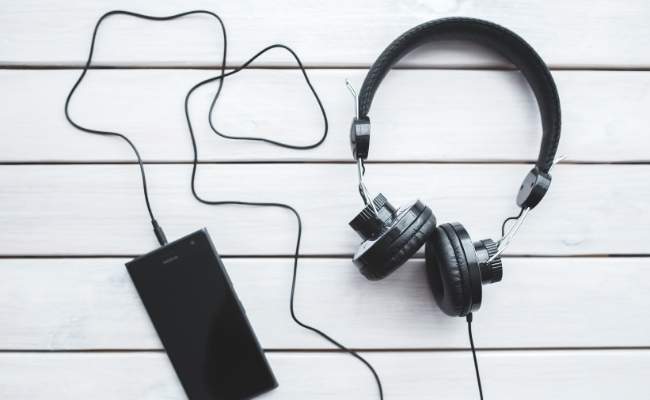
Before jumping to any conclusion, try to check the headphone's cable and jack first. Most of the time, this problem is caused due to loose wire connections and faulty headphone jacks. Many things can damage your headphones jack. The bending of wires near the headphone jack connection may damage them.
The internal connection of wires and the headphone jack is very sensitive. Even in the most durable headphones, you might end up damaging them if they are not handled with care. Anyways, check if the connection to the headphone's jack is faulty or any internal or external damage to the cable. Carefully examine the whole cable and connections to both the headphone and the jack.
If this is the problem, you can fix it quickly. However, do not jump the wagon and cut the wires. If you do not know how the headphone's connection works, contact the experts to repair your headphone.
And, if your headphone supports detachable auxiliary cable, then try using a different one. You can borrow it from your friend for the time being.
Port Issues
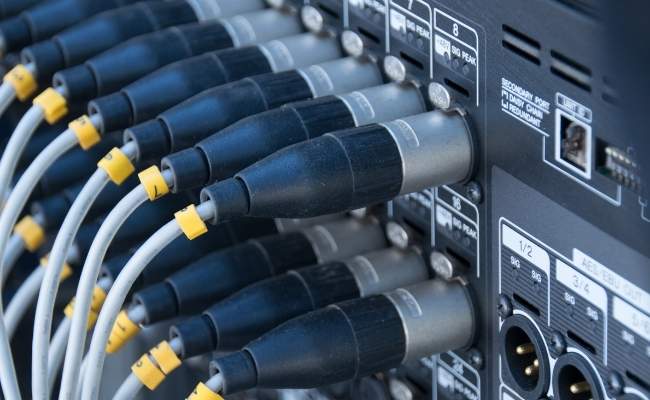
If it is not with the cables or jacks, examine your device's and headphone's port. A dusty port might be causing your headphone to make hissing sounds because the dirty ports can distort your headphone's audio quality.
You can try to clean the ports on both your headphone and your device. You can use ear cleaning sticks or small-sized cotton swabs to clean the ports. However, take extra care while doing so, and avoid using any liquid to clean them. You may end up damaging your headphones or device.
Environment
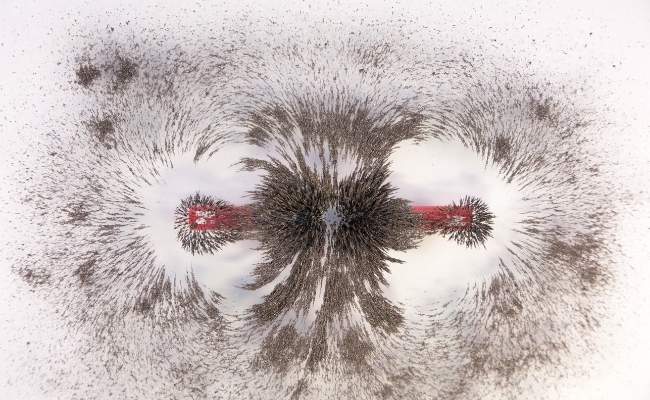
The environment can also be a contributing factor in producing static noise on your headphones. If you use your headphone in a magnetic environment, then it might be an issue. The magnetic force distorts the audio signals. Thus a static noise is produced.
Many cabinets nowadays come with magnetic latches to hold them in their place. Many things around you produce a magnetic field.
The wireless signals around you can also interfere with your headphone's audio signals, even for wired headphones. For example, if you place your mobile phone on a speaker and give a phone call to the phone. You will experience the distorted and static noise in the audio played on the speaker. And that's because the GSM signals of your mobile phone are messing with the audio signals.
If the environment is causing your headphone to produce static noise, it would be best to change your setup's location.
Static Noise in Wireless Headphones
Static Noise is not new to the wireless headphone's universe. Due to its wireless connectivity, many things can interfere with their wireless signals. You can try to use your wireless headphone in different locations to see if it works. And try to achieve a smooth connection by removing anything coming in the way of their wireless signals.
There are many objects in your home that can interfere with your headphone's wireless connections. Things like the microwave or fluorescent lightning tend to disturb the wireless audio signals. Try to use the headphone away from these things and see if it works.
Your device might be causing the headphone to make a buzzing sound. You can try pairing it with a different device.
Headphone's Driver Unit
Before moving to software level fixes, you should also check the driver unit of your headphone. The driver unit or headphone's speaker may be the leading cause of this issue. The headphone's speaker can get faulty and produce distorted sound after several years of use.
You can try using that headphone on different devices and check if the static noise is still coming or not. Suppose you experience static noise on your headphone, even on different devices. Then, the headphone's driver can be the root cause of that issue.
Unfortunately, you cannot fix the headphone's speaker quickly. You will have to consult an expert to check if they can be repaired. Or you can claim the warranty if it is still valid. For your prompt notice, if you have been using that headphone for several years, then you might have to upgrade it and replace it with a new pair of headphones.
Amplifier and Sound Card
Your headphone may need an amplifier (of matching impedance) or a good sound card to give good audio quality. High power-consuming headphones require an amp or sound card to work correctly.
If you are wondering whether your headphone needs an amplifier or not. Then, you can check the impedance rate of your headphone. If it is more than 50 ohms, then you might want to get an amplifier. The higher the impedance rate, the more power the headphone needs. However, you can also check the expert's review on that particular headphone and see if they recommend getting an amp or not.
But, for testing purposes, you can borrow an amp from your friend or colleague. Just make sure you need an amp or not before getting one.
Audeze LCD-2 or Beyerdynamic DT990 Pro are some examples of high impedance headphones.
Also Check:
Best Headsets for Truck Drivers
Remove Static Noise from Headphones on Windows PC
It is recommended that you test different headphones on your computer before beginning to tweak the settings. Maybe your headphone is faulty, and that way you'll save your time from tweaking the system. Just borrow another set of headphones, and try them on your PC.
If your headphones are getting static noise issues on the PC level, then the following are the few fixes you can try.
- Check and Update Drivers
- Roll Back Drivers
- Remove Faulty Audio Drivers
- Third-Party Audio Drivers
- Disable Audio Enhancements
- Change Audio Formats
- Utilize Audio Troubleshooter
- Change Power Saving Settings
- Replace CPU Fans
- Change or Replace Power Supply
Check and Update Drivers
Outdated drivers cause many unknown issues in your PC. Always try to stay updated with the latest drivers. These small updates are for optimizing your hardware and fix bugs. You can try updating your audio drivers. To do so, follow our lead.
Note: You can skip this step if your drivers are up to date.
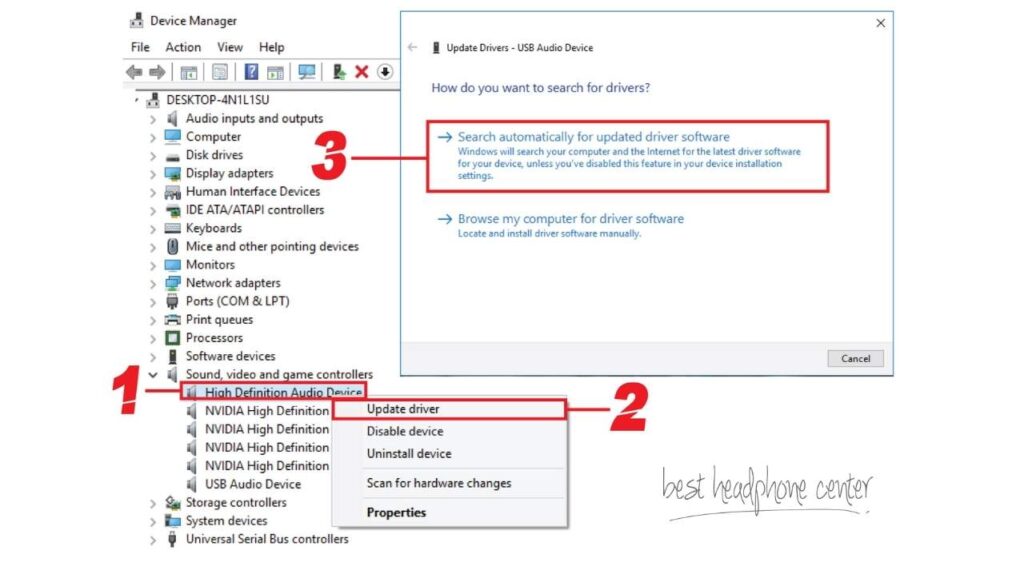
- Step 1: Go to the Device Manager . You can access the Device Manager from PC's (My Computer) properties, or you can click the " Windows + S" key and type Device Manager .
- Step 2: Find your audio devices. Press left, click on your audio device, and click on update drivers .
- Step 3: An update driver window will open. Select the Search " Automatically for updated driver software ." Make sure that a working internet is connected to your computer. This step requires the internet to download the drivers automatically.
- Step 4: Restart your PC after the successful installation of the drivers.
Roll Back Drivers
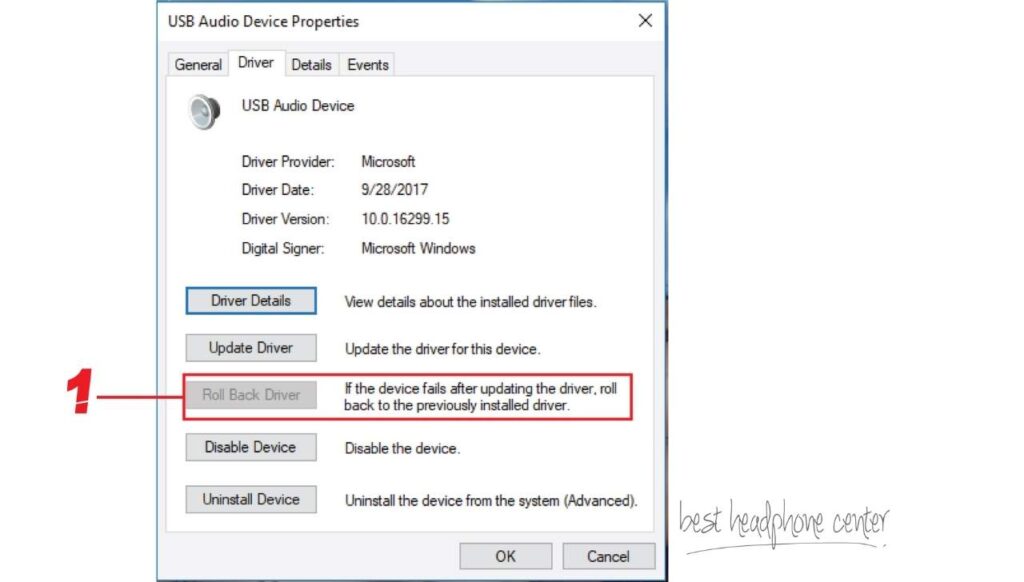
Suppose you are facing this noise issue after updating your drivers. Then you can also roll back to previous drivers. You can follow the below steps to do so.
- Step 1: Go to the Device Manager again. And, left-click on your audio device.
- Step 2: Go to Properties . A new window will pop-up. From there, go to the Drivers tab, and find the Roll Back Driver option. From there, you can roll back to your previous audio drivers.
- Step 3: You might need to restart your PC after rolling back the drivers.
Remove Faulty Audio Drivers
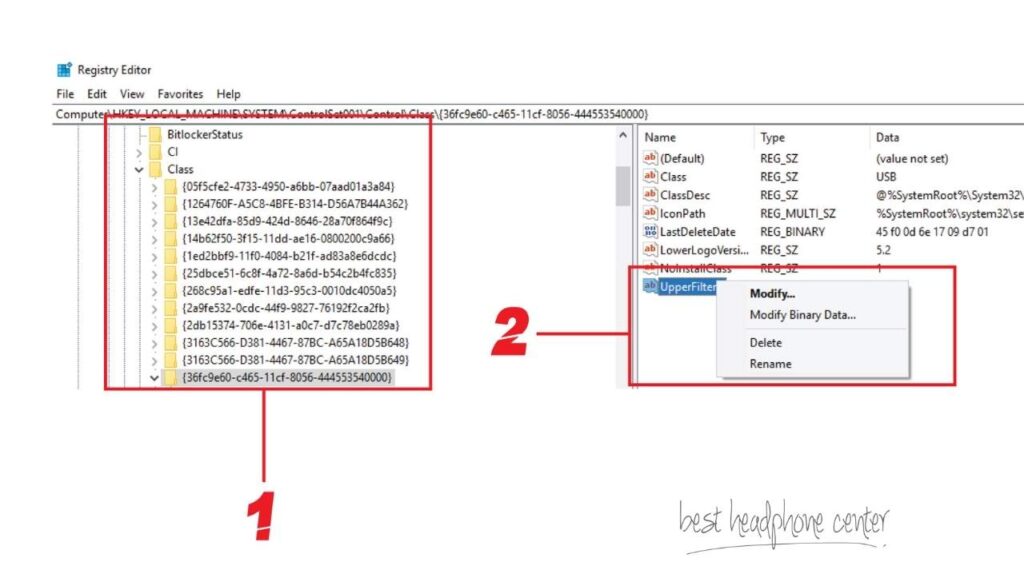
If you still have the static noise issue, follow these steps to edit the computer's Registries.
Note: Take extra care while editing/ modifying/ deleting registries. You may end up causing a significant issue on your computer. Always make a back-up of your registries before editing them. You can take a back-up by clicking on "File," then going to "Export," and then "Save." That way, you'll get a back-up of your registries, which you can restore if you mess up.
- Step 1: Press " Windows + R ." A search box will pop-up. Type " Regedit " on the search box, and hit enter. A Registry Editor Window will pop up.
- Step 2: Now navigate to Computer> HKEY_LOCAL_MACHINE> SYSTEM> ControlSet001> Control> Class> {36fc9e60-c465-11cf-8056-444553540000}.
- Step 3: You will find different String Values in your left panel. Press left-click on UpperFilters and delete it. It will remove the corrupted or faulty drivers from your PC.
- Step 4: Now restart your PC, and see if the issue is solved or not.
Note: Computer\HKEY_LOCAL_MACHINE\SYSTEM\ControlSet001\Control\Class\{36fc9e60-c465-11cf-8056-444553540000}. You can just copy-paste this value in your search bar to navigate directly to that file.
Third-Party Audio Drivers
After the restart is complete, play any audio to check if your headphone still gives static noise. If they are not giving any static sounds, then VIOLA! It's done. If not, then you can consider installing drivers again. You can use third-party software to update your audio drivers. Tools like " DriverBooster" can find missing drivers and update them automatically for you.
This time, try Realtek Audio Drivers. Download them from their official website. It is an easy-to-understand installer pack. It will ask to restart your pc after the installation. Save your work, and restart your PC. The Realtek Audio Drivers will get functional after the restart. This might help you remove the electrical noise from your headphones.
Disable Audio Enhancements
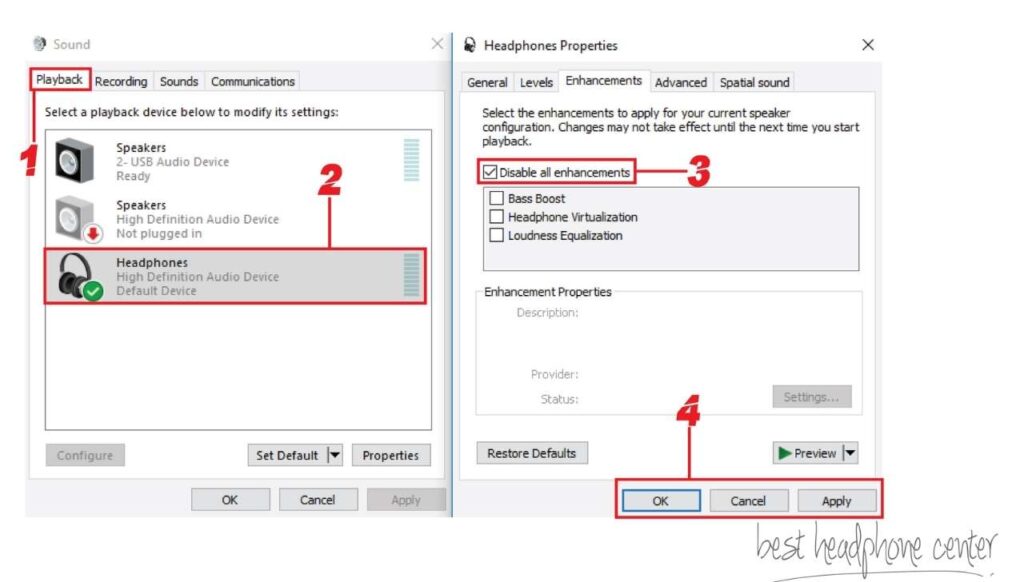
The enhancement feature in audio settings is handy in Windows. You can control your audio profiles from there. However, they can also be the cause of the static or hissing noise in your headphones. You can disable them to see if that helps. You can follow these steps to disable it.
- Step 1: Point your cursor to the audio icon on the taskbar. Left-click it and go to Playback Devices .
- Step 2: A Playback Devices prompt will appear. Navigate to your headphone in the playback tab from there. Double-click on it to go its properties . Or you can left-click on your headphone and selecting Properties .
- Step 3: Another Headphone Properties box will appear. Navigate to the Enhancement Tab and check the box saying " disable all enhancements ."
- Step 4: Click on Apply and then OK .
Change Audio Formats
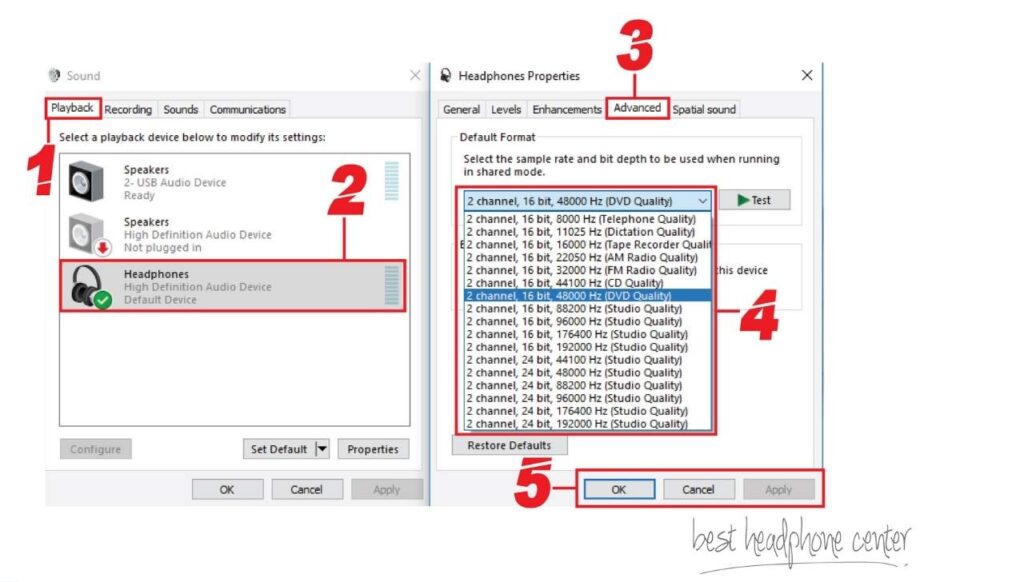
Hopefully, you have removed the static noise from your headphones by now. If not, then follow us through these steps. The Audio Format can play a significant role in your headphone's sound quality. You play with these settings or use them to make your headphones sound louder. And, it might help you remove the frustrating static noise from your headphone's audio.
- Step 1: Again, go to the Playback Devices settings. You can access it by left-clicking the audio icon on the taskbar and click Playback Devices .
- Step 2: Find your headphone in the Playback tab and double-click on it. Headphone properties prompt will appear just like before.
- Step 3: From there, navigate to the Advanced tab. Here you will see many different audio formats in the drop-down box.
- Step 4: You can select any audio format from there and click Apply and OK .
Note: It is recommended that you select a lower audio format before. Apply those settings, and test the audio quality. Then, try to increase the audio format and see if there is any difference. It will reduce the static noise to some extent or completely. Try to check all the audio formats one-by-one.
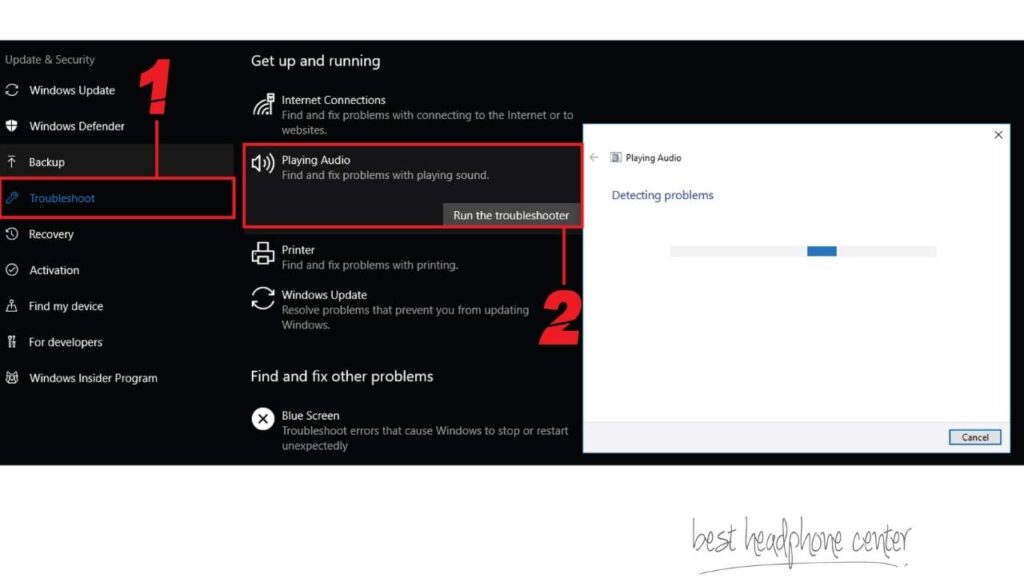
Utilize Audio Troubleshoot
The Audio Troubleshooter is a great feature offered by Windows. It will detect and try to resolve any issues related to audio. It is a compelling feature; you should utilize it as well. Who knows, it will fix the static noise issue. Follow the given easy steps to access Audio Troubleshooter.
- Step 1: Again, point your cursor to the audio icon on the taskbar, left-click it and select Troubleshoot Sound Problems .
- Step 2 (Optional): You can also access the Audio Troubleshooter from the Settings . Press the " Windows + S " key, type the " Settings " on it, and press enter. A Settings window will open. From there, go to Update and Security and navigate to Troubleshoot .
- Step 3: Once you've clicked the Audio Troubleshooter, " a troubleshoot box will appear that will detect the audio-related issue automatically.
Change Power Saving Settings
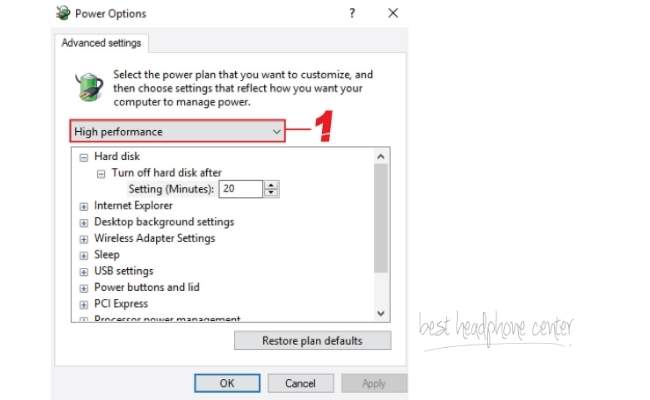
The power-saving feature on Windows is one of the best things, especially for laptops. What it does is reduces the power consumption of your PC by limiting various things.
However, it might end up messing with your headphones, which might end up in you having the static noise. You can try changing the power settings of your PC to see if it helps.
- Step 1: Press the " Windows + S" keys on your keyboard. and type "Edit Power Setting."
- Step 2: A new window will pop up. Navigate to Change Advanced Power Settings .
- Step 3: Another prompt box will appear. In the drop-down menu, select the " High Performance " mode and click Apply and OK .
Replace the CPU Fans
Many sorts of issues might occur if your PC or CPU temperature rises. Your PC might gets too hot for it to function correctly. Therefore, changing the CPU fans can turn out valuable for you.
However, before jumping the wagon, you can monitor the CPU temperatures. If they are normal even in high CPU usage, then this might not be the problem. I use the HWMonitor tool to monitor my CPU and GPU performance, stats, and temperatures.
On the other hand, if your CPU temperature is high, it would be best to replace or upgrade the CPU fans. It might help you remove the static noise coming from your headphones.
Follow the below steps to remove and install a CPU fan.
- Step 1: First of all, completely turn off your PC, and remove the power cord from the main plug.
- Step 2: Now, unplug the fan's cable from the motherboard.
- Step 3: Use a screwdriver to remove all the screws on the CPU fan. And, gently remove the old fan.
- Step 4: Now, mount the new CPU fan on the correct screw location, and screw the fan in its correct place.
- Step 5: Plug in the CPU fans cables onto the motherboard.
- Step 6: You can now turn on the computer and check if the issue is solved or not.
Change or Replace Power Supply
The uneven distribution of power in your computer can lead to many different issues. Some good headphones require more power to function correctly. And, an insufficient power supply can strip off their true potential.
You can remove and try another power supply on your PC.
- Step 1: Turn off your computer entirely and remove the main power.
- Step 2: Now remove the connection from all the internal devices like the hard diskette and CD/DVD drive.
- Step 3: Unplug the power supply connection from the motherboard. And, use the screwdriver to remove all the screws holding your power supply.
- Step 4: Gently remove the power supply from your PC.
- Step 5: Replace it with another power supply, and place it in its location.
- Step 6: Screw it in the place properly, plug the power supply's wire onto the motherboard, and connect all the internal devices.
- Step 7: Turn on your PC. Hopefully, it will remove the static noise from your headphones.
Related Content:
How to Use Headphones as a Mic on PC
Difference Between Gaming Headset and Headphones
Remove Static Noise from Headphones on Android Phones
Many things might cause a headphone to produce static noise or hissing/ buzzing sound on Android Devices. It could be a software issue, signal interference, device issue, or headphones issue.
Before trying the following fixes, We would recommend you test your Android Device with different headphones. If you are still having audio issues, then you can follow the below fixes.
- Stop all the Apps running in the background.
- Use Airplane or Flight Mode
- Switch from Wifi to Mobile Data
- A Quick Restart
- Change Audio Settings
- Install System Updates
- Use Third-Party Equalizer App to tweak the sounds.
- Do a soft reset
- Use Warranty
Note: We will be using the Samsung Galaxy Grand Prime+ Android Device to demonstrate the process.
Stop All the Apps running in the background.
Multiple apps running in the background can cause your mobile phones to overload their ram and CPU usage. Hense, resulting in a distorted audio quality.
You can start by stopping all the apps running in the background.
- Step 1: Click on the background app button on your mobile device.
- Step 2: Swipe all the unnecessary apps to stop them from running in the background.
Use Airplane or Flight Mode
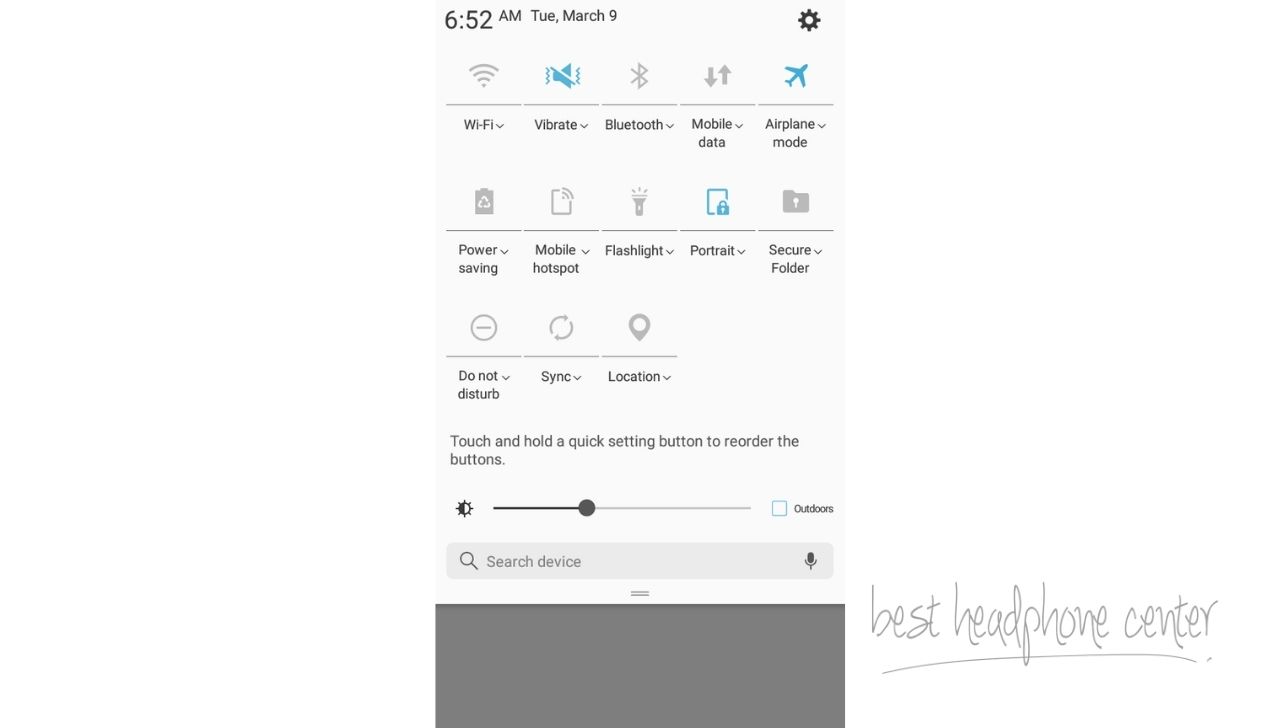
Mobile Phones deal with many kinds of signals and frequencies. And they can often mess with the audio signals. Using the Airplane or Flight mode on your Android Phone will disable most of the signals and frequencies from entering your device. You can try this quick fix and see if it helps.
- Step 1: Swipe down the quick menu on your Android Device.
- Step 2: Enable the feature called " Airplane mode " (or " Flight Mode" for some devices).
- Step 3: Now play any audio on your mobile phone and see if the issue is solved.
Switch from Wifi to Mobile Data
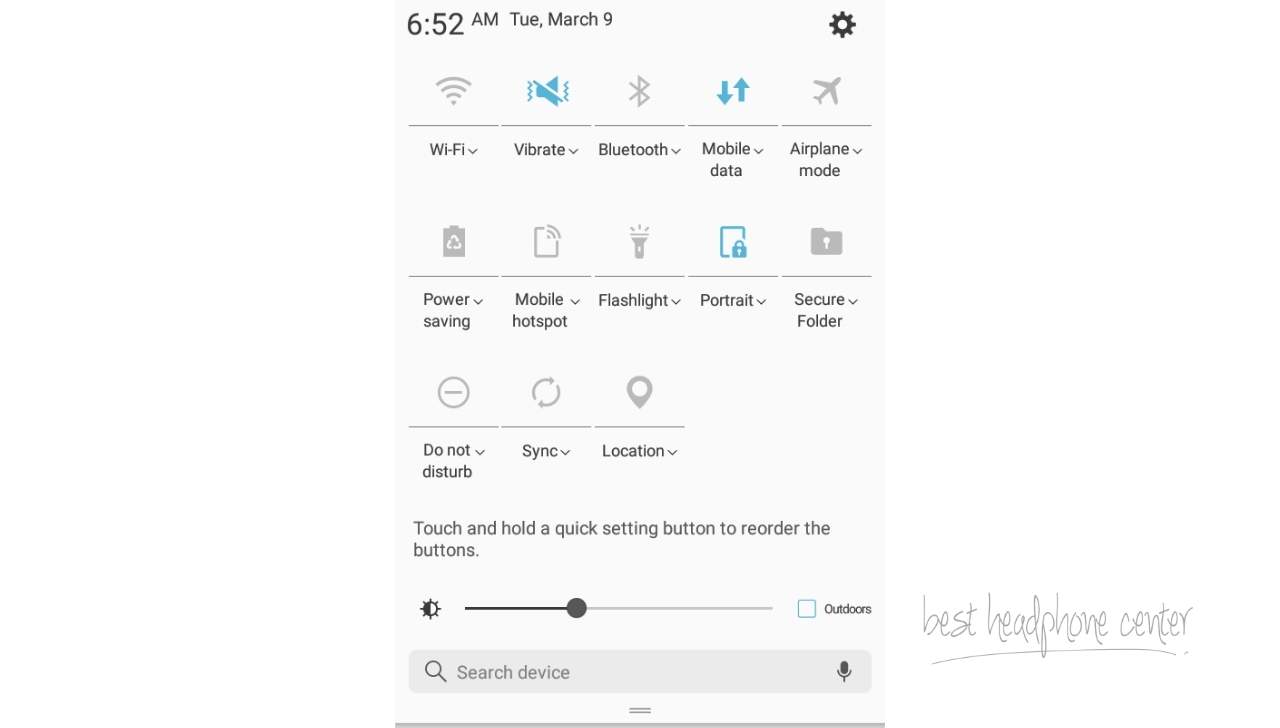
Wifi signals can also interfere with the audio signals of your headphones from time to time. If you are getting a static noise on streaming and online video or podcast, it is most likely because of the network overload. Switching from Wifi to Mobile Data may help you reduce the network overload and remove the static noise issue on your phone while streaming online.
- Step 1: Swipe down the quick menu on your Android Device.
- Step 2: Turn Off the Wifi , and Turn On the Mobile Data option.
- Step 3: Now, try to stream any video online to see if the issue is resolved or not.
A Quick Restart
Sometimes, your device might get overload and produce messed-up audio. You can always try a quick restart. It solves many problems itself.
- Step 1: Press and hold the Power Button on your Android Device.
- Step 2: Select the Restart option to restart your device.
Change Audio Settings
Some Android devices allow the user to change the Audio Format in the settings. You might need to unlock your Developer Mode to access this feature. Method of unlocking the Developer mode defer from device to device.
After the Developer mode is unlocked, you can use the following steps to change the audio formats.
Note: This setting may defer from device to device. However, most Android Devices have similar settings. You can navigate to this feature from settings. The following steps are demonstrated through a Samsung device.
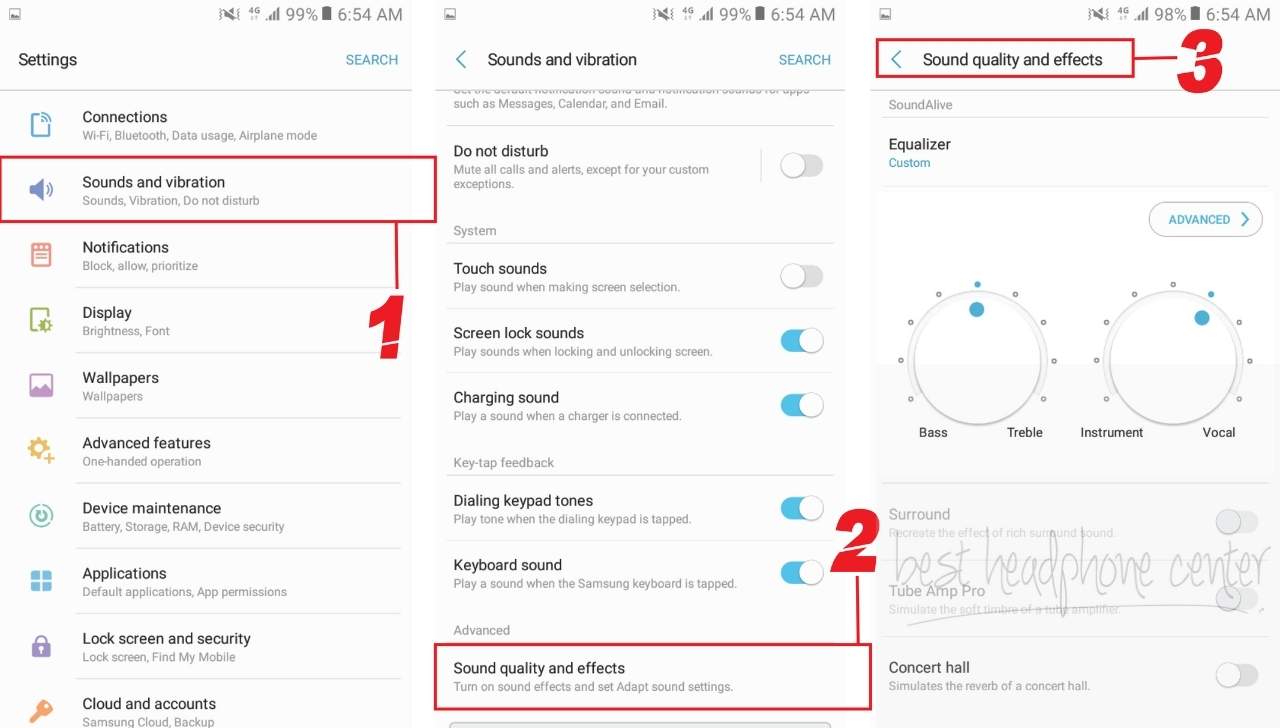
- Step 1: Swipe down the Quick Menu on your device, and go to Settings .
- Step 2: From there, select the Sounds and Vibrations section.
- Step 3: After going to the Sound Settings, navigate the sound Quality and Effects feature.
- Step 4: From here, you can equalize and tweak the audio settings of your mobile phone.
Install System Updates
Bugs and errors are not new to Mobile devices. Over time, software-level bugs may occur on your android device. On the bright side, the manufacturers of mobile phones and software developers release many updates or "security patches" to resolve the bugs and errors.
This means, keeping your android device up-to-date will resolve most of the currents bugs. The noisy sound quality of your headphone can also be caused due to outdated system update. Therefore, it would be best to update your device with the latest updates.
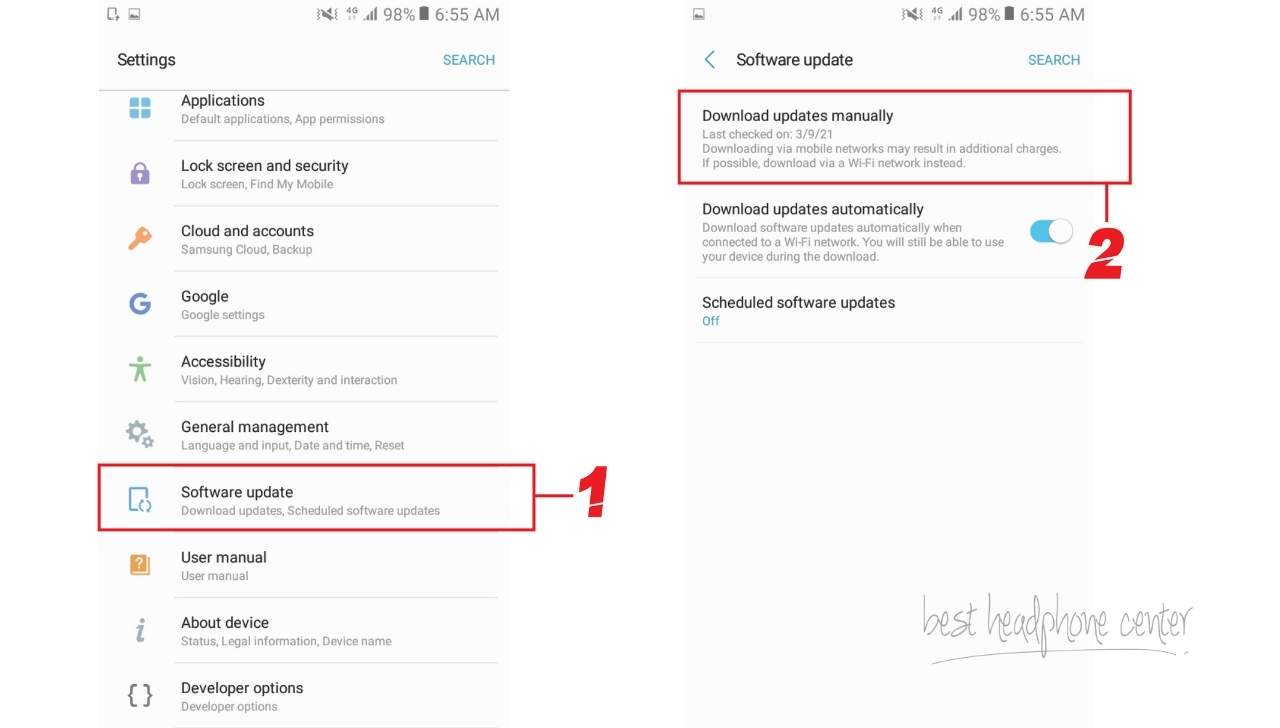
- Step 1: Go to the Settings on your Android Device.
- Step 2: Navigate to the Software Updates option in the Settings .
- Step 3: From there, you can select Download Updates Manually . It will look for the latest software updates for your device automatically.
- Step 4: After the updates are complete, restart your device.
You can also use the " Updates Scheduler " option to make a regular schedule automatically look for the latest updates.
Use a Third-Party Equalizer App
Previously on "Change Audio Settings," we've told you how to change audio settings and equalize them to remove static noise. However, some android devices may not have that feature to start with. In this case, you can download a third-party equalizer application from the Google Playstore.
These third-party applications will allow you to change and equalize the audio according to your need. You might be able to remove the static noise issue of your headphone after some tweaks.
We haven't downloaded an equalizer software to demonstrate. But rest assured, they are all easy to use. Here are few best equalizer applications for android, according to the Android Authority.
Do a Factory Reset - Roll-back To The Default Settings
Sometimes, the software level issues cannot be resolved without a soft reset. A soft reset removes all the data from your device and roll-back all the settings to their default options.
With such a big step, you might be wondering how is this gonna help you? There might be some changes or tweaks that you made with the audio settings of your device earlier. It will roll-back all the changed settings to their default options and start as a new device out of the box.
Note: For your quick disclaimer, The factory reset will remove all of your data from the mobile device and start as new. You should make a back-up of all your data before taking this step. You can either copy all your data into your PC or use Cloud Services like Google Driver to back-up all your data. You will be able to restore all the data after doing a Factory Reset quickly.
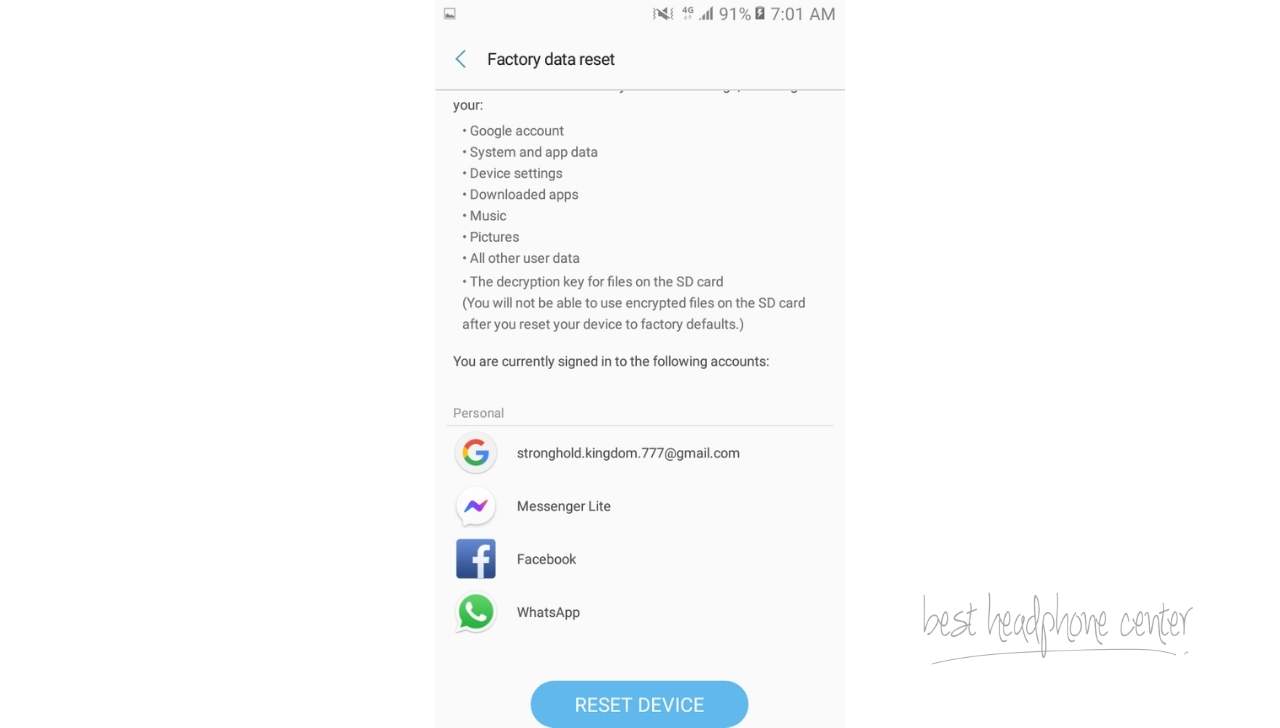
- Step 1: Go to your Mobile Phone's Settings once again and Search for the term Reset on the top's search bar.
- Step 2: A factory reset option will appear after the search is complete. Tap on it and select Factory Reset .
- Step 3: Your device will ask again to make sure you want to perform a factory reset. Read everything carefully, and press Factory Reset .
- Step 4: Your device will automatically start to perform a factory reset.
Use Warranty
Suppose you are not able to resolve your static noise issue after performing all the above tweaks. Then there is a good chance that your device is outdated or faulty. If your Mobile phone still has a void warranty, then contact your device's manufacturers to replace or repair your device.
However, if your device does not have a void warranty, you can contact an expert to repair your phone or consider upgrading your device.
Also Check:
Best Headphones for Classical Music
Best Open-Back Gaming Headphones
Remove Static Noise Issue from Headphones on an iPhone.
Having a static noise issue on an iPhone is a poor thing. I haven't faced this issue in my lifetime. However, there are still many things that might cause your iPhone to produce a static noise in its audio quality.
You can start with cleaning the headphone jack (if any). The debris can inside your iPhone's audio jacks can cause a distorted connection, which may result in static in your headphones.
Following are the few things that might resolve your static noise issue on an iPhone.
- Stop all the apps running in the background.
- Perform a quick restart.
- Use "Do Not Disturb" mode
- Restore your iPhone
Stop Background Apps
iPhones are optimized well for multi-tasking. They have good potential to run many apps simultaneously. However, it can cause your device to produce a hissing or distorted audio sometimes.
Just like android, stopping all the background apps can be an excellent way to start with.
- Step 1: Double-tap on the home button of your iPhone.
- Step 2: Swipe up all the unnecessary applications to stop them from running in the background.
Perform a Quick Restart
Just like android devices, performing a quick restart can solve most of the issues on mobile devices. You can try restarting your iPhone and see if it helps.
Note: Make sure to save all your pending tasks before doing a restart.
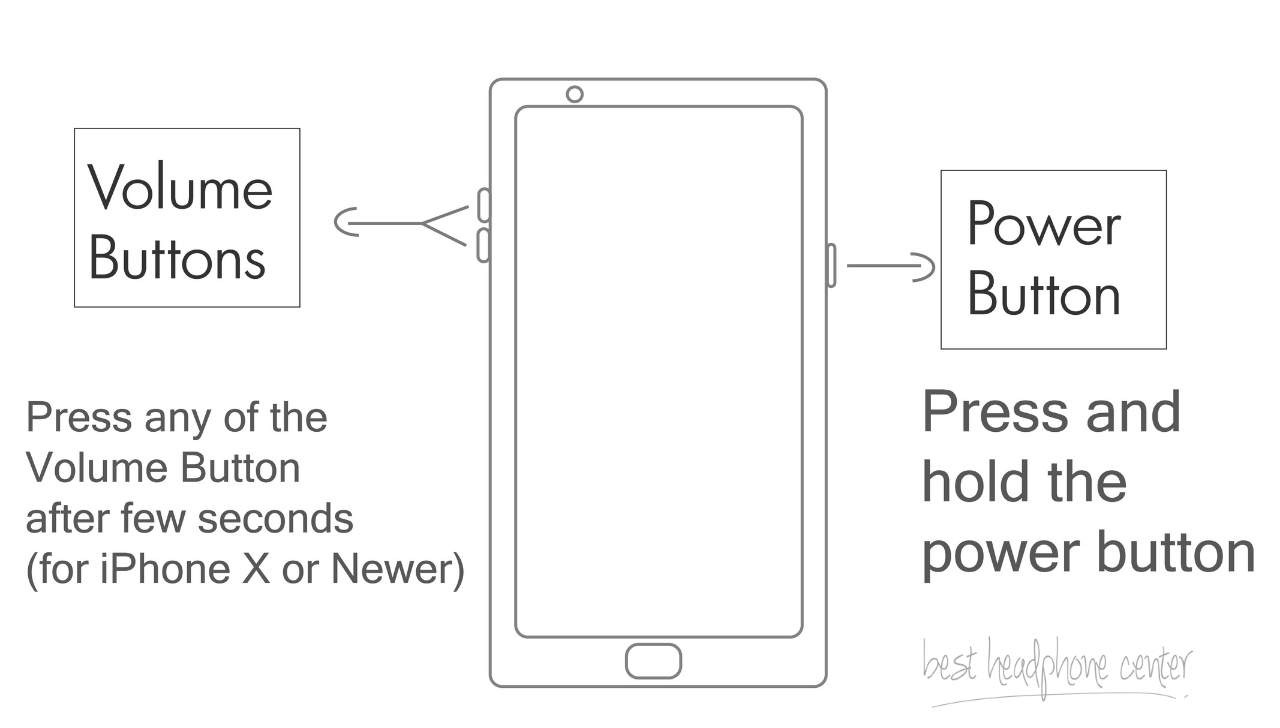
- Step 1: Press and hold the Power Button on your iPhone. For iPhone X or newer model, Press and hold the Power Button and press either of the volume buttons after a few seconds while holding on to the Power Button .
- Step 2: A Power Off slider will appear. Slide it down to the right. Your device will start to shut down.
- Step 3: When your device is completely shut down, press and hold the Power Button to restart your device.
Use "Do Not Disturb" Mode
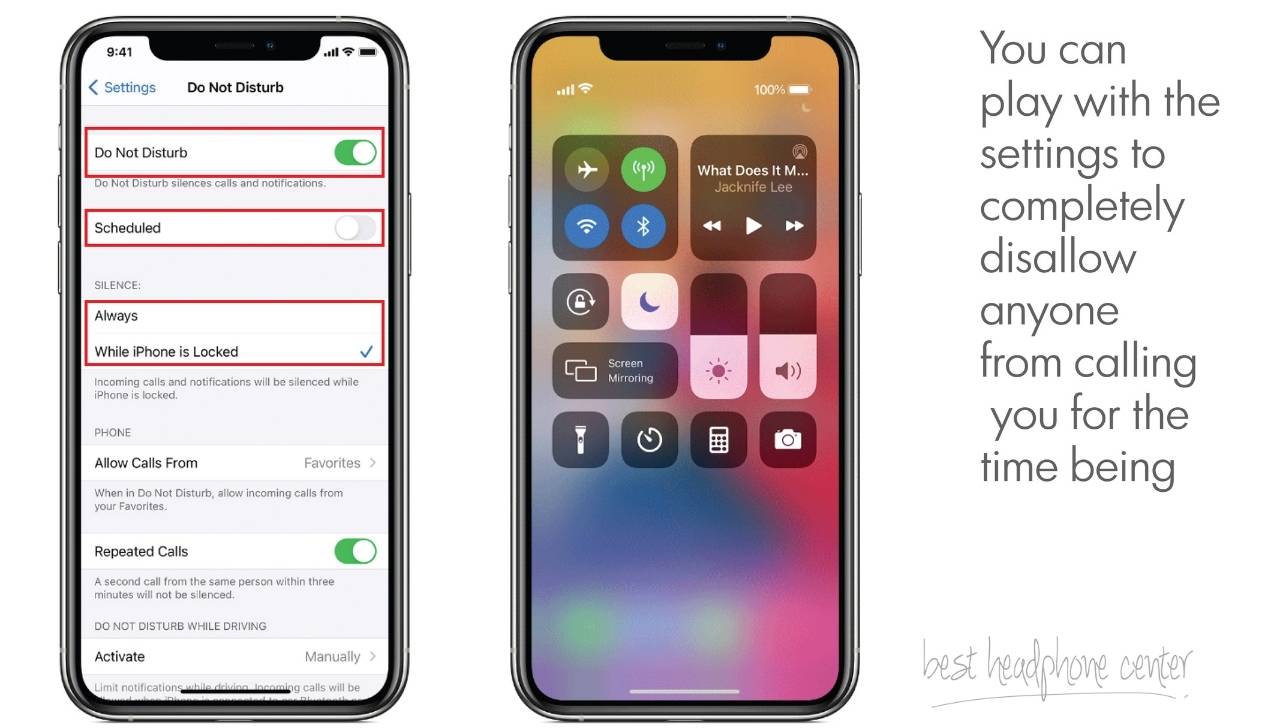
The "Do Not Disturb" mode can be a convenient feature on iPhone. It allows the user to mute phone calls, notifications, and many other sounds from disturbing you while your iPhone is locked.
You might be asking, how will it help you? Earlier, we have said that the GSM signals can also cause your device to distort audio. The DND (Do Not Disturb) mode will allow you to mute calls and prevent someone from calling you. You will be able to troubleshoot if GSM signals are causing your headphones to produce static noise.
You can follow these steps to enable DND mode.
- Step 1: Swipe up the Control Center of your iPhone.
- Step 2: Press and hold the Cresent moon icon to enable and schedule DND mode.
You can also enable the "Do Not Disturb" mode from the settings.
- Step 1: Go to your iPhone's Settings and navigate to the " Do Not Disturb " option.
- Step 2: You can enable the "DND" mode from here and change other settings like choosing between " While the iPhone is locked " or " Always ."
Restore Your iPhone
Like Android's factory reset, the Restore on iPhone rolls back all the settings and changes to their default option, just like a new phone. There are some software level bugs and errors or faulty system updates that cannot be resolved without a factory restore.
You can try to restore your iPhone and see if it helps.
Note: Make sure you make a backup of all your data and accounts before performing a factory reset. The factory reset of an iPhone will erase all your data and remove/ delink all your accounts. You can use iTunes or iCloud to backup your data.
There are three different ways to restore your iPhone. You can use any of these methods to restore your device.
- Step 1: Connect your iPhone to your computer.
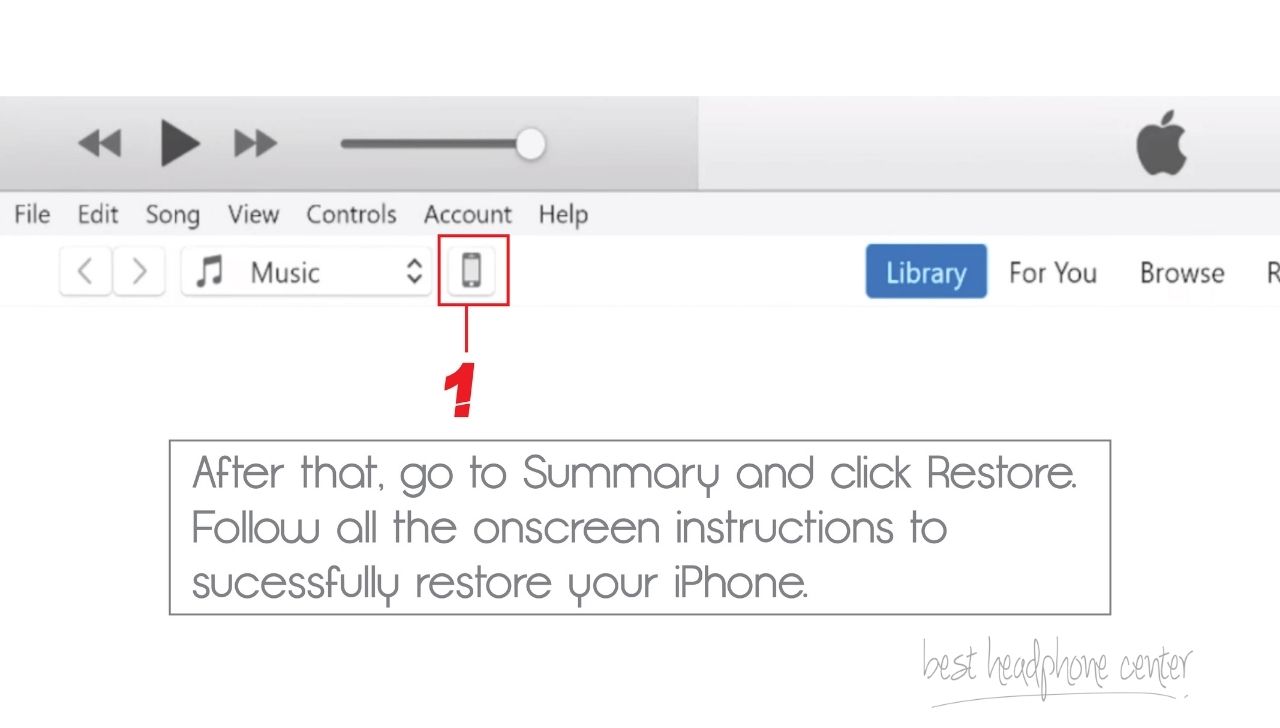
- Step 2: Open iTunes on your PC, and click on the mobile button icon on the top.
- Step 3: Click on Summary and then Restore . It will start the restoring of your iPhone.
- Step 4: All the instructions will be provided on the screen. Follow them to complete the process of restoring your iPhone.
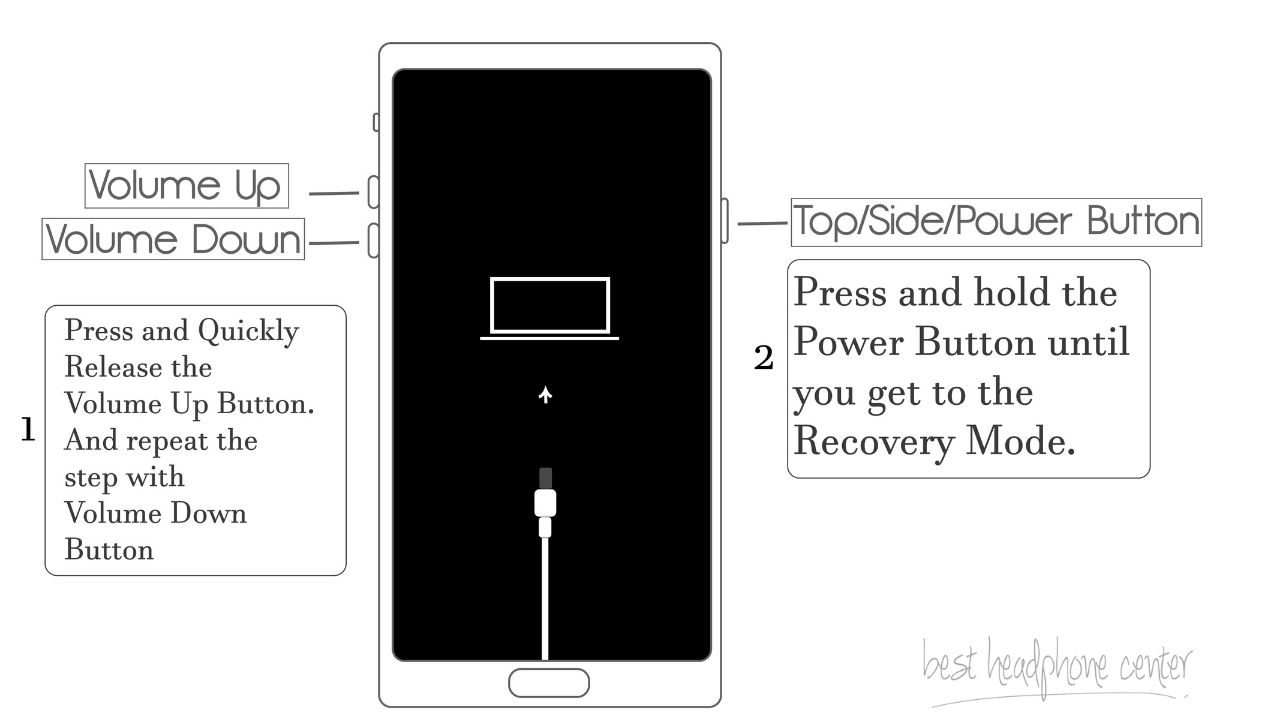
You can also restore your iPhone using the recovery mode. This step is a little complex than the standard reset method. You can follow the below steps to restore your iPhone with Recovery Mode.
- Step 1: Connect your iPhone to the computer and open iTunes.
- Step 2: Press and release the volume up button, and press and release the volume down button. Now, press and hold the power button until your iPhone starts to restart.
- Step 3: Keep holding the power button until you see the recovery mode on your iPhone.
- Step 4: Now, follow the above steps to restore your iPhone. Click on Mobile icon < Summary < Restore < Follow the instructions.
Also Check:
Best Gaming Headphones under $50
How to Pair TaoTronics Headphones?
How to Remove Static Noise from Headphones on a Mac
The Mac OS is also familiar with the static noise or background hiss sound in the headphones. You cannot do many things on Mac OS to remove the background hissing sound on headphones. However, there are few things you can try.
Note: For your quick disclaimer, I do not own or use the Mac OS. I've gathered all the information from around the web and showing you the tips as a curator.
The following are the few things you can do to solve: distorted, static noise, and background hissing sound on Mac OS.
- Restart your System
- Change Audio Preference Settings
- Troubleshoot Audio
Restart Your System
Simply restarting your Mac can solve many problems. A static noise issue can be caused after a system update. A quick restart might resolve your issue.
Follow the below steps to restart a Mac OS.
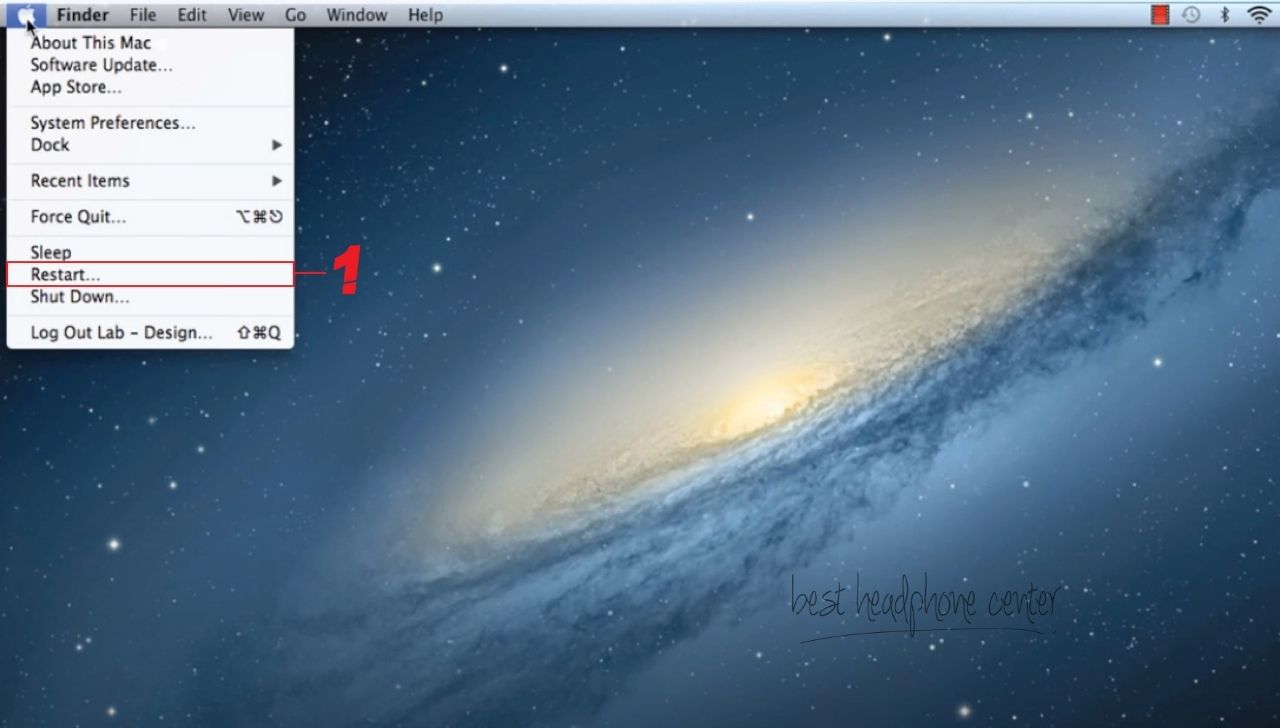
- Step 1: Click on the Apple icon on the top-left corner.
- Step 2: A drop-down menu will appear; select the restart option.
- Step 3: After the restart is complete, play any audio to check if the issue is resolved.
Change Audio Preference Settings
The System Preference settings allow you to play with the audio settings on your Mac. You can use these features to change audio settings and hopefully resolve the static noise issue.
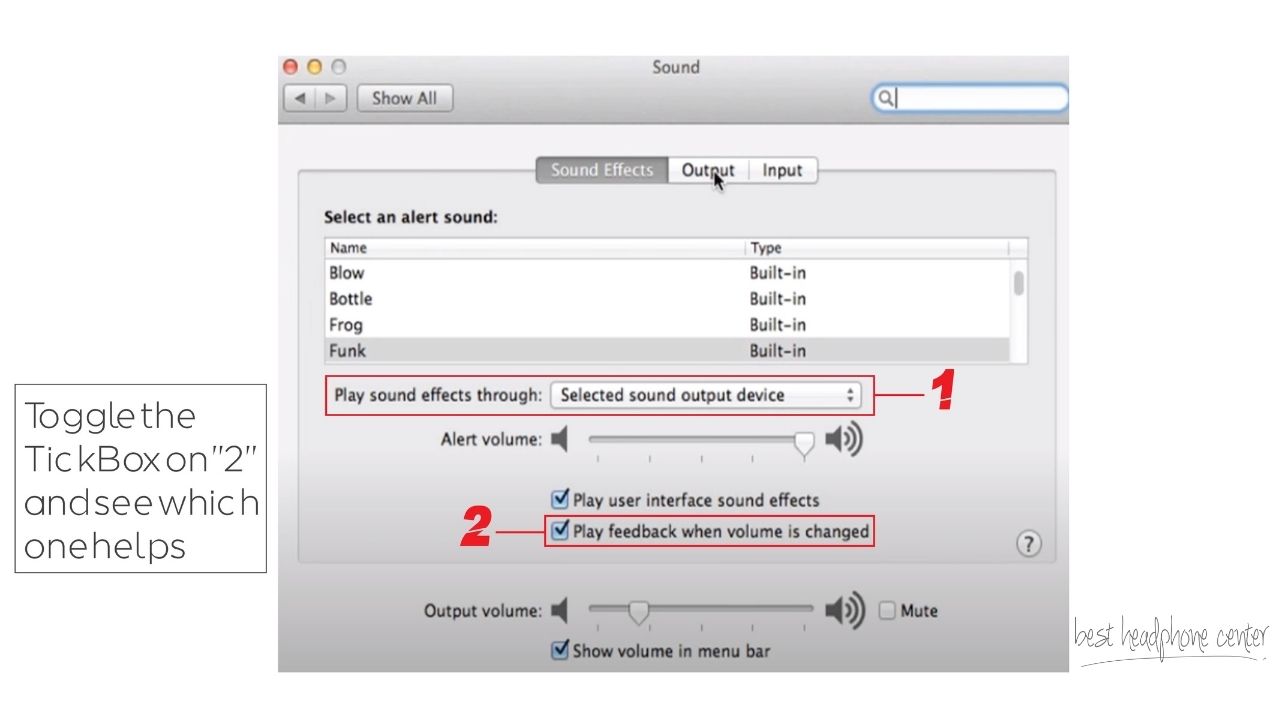
- Step 1: Click on the Apple icon on the top left corner. From the drop-down menu, select System Preferences .
- Step 2: In System Preferences , select Sound .
- Step 3: In Sound , go to the Sound Effects tab.
- Step 4: Now, check the output audio devices. Make sure your headphones are selected.
- Step 5: Check the tickbox named " Play Feedback When Volume is Changed ." Now, uncheck the box to see if the static noise is gone.
Note: You will have to check the " Play Feedback When Volume is Changed " in On and Off. And see which one removes the static noise.
Audio Troubleshooter
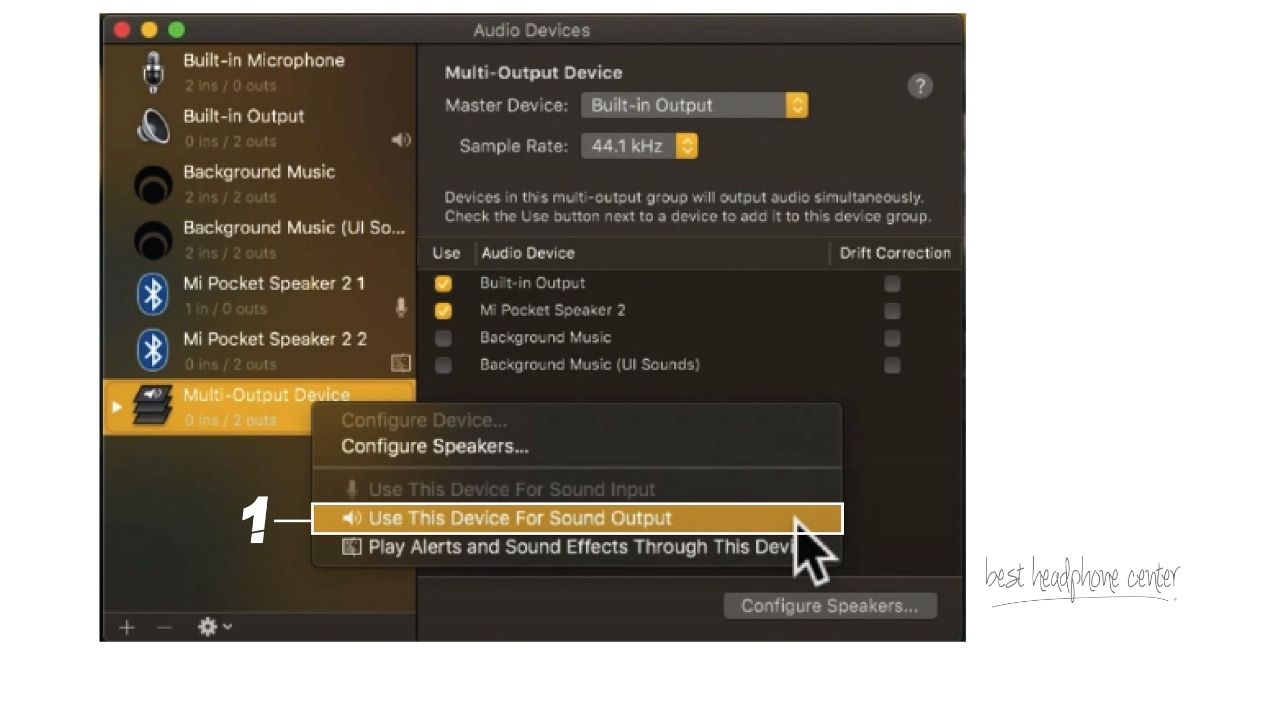
If the System Preference settings do not resolve the static noise issue. You can use the Audio MIDI Setup to change some settings and see if it helps.
- Step 1: Press the Command + Space key. A spotlight search box will pop-up.
- Step 2: Type "Audio MIDI Setup" on the search bar and hit enter. An Audio MIDI Setup will appear.
- Step 3: From the list of all the available devices on the left side, right-click on your output device.
- Step 4: Now, select the " Use this device for Output " option.
How to Prevent your Headphones from Producing Static or Hissing Sound
Everyone knows that prevention is better than cure . You can always take precautionary measures to prevent your headphones from producing distorted audio or strange hissing sounds.
Headphones are expensive, and even if they are not, you should take care of them. Following are the few things that you can do to save your headphones.
Clean Your Headphones Regularly
You should clean your headphones regularly. It will prevent them from breaking and allow them to stay intact for a long-lasting time. Not only that but also, you'll be able to hear crystal clear audio. Cleaning the debris in the earcups can prove helpful for you.
You can use cotton swabs or Q-tips to clean the speaker of your headphones. You can use isopropyl alcohol to clean the sticky debris on your headphone. However, do not excessively use liquid to clean your headphones.
Here is a
on how you can clean your headphones.Take a Good Care of the Wires
The wires of the headphones are not new to breaking. You might find your wires broken frequently. The best practice here is to use the wires of your headphones gently.
Over time, the wires may get damaged, loosened, or faulty. You can tape (with a soft fabric) the wires' sensitive parts to prevent them from tangling or turning. It will help you reduce the damage done to the headphone jacks and wires.
If you remove the cables from your headphone regularly, make sure you remove them gently to avoid any breaking.
Upgrade
Like any other electronic, an old piece of headphones may get damaged over time. And, you might face all kinds of issues with them.
In that case, it would be the best time to consider upgrading to the newer headphones.
Here at Best Headphone Center, we provide Buying Guides on many different types of headphones. You can find one for yourself.
Conclusion
Getting a static noise issue is the worst thing to happen. It completely ruins your listening experience.
There are few tricks you can implement to remove this strange noise from your headphones. In this guide, we've shown you how to solve this issue on Windows, IOS, Mac, and Android. Moreover, this issue can be caused due to the headphones themselves.
I hope you have solved your issue through our guide. If so, then leave a comment down below. And, share this content with your loved ones so that they can benefit from it as well.
Related Posts
Why You Should and Shouldn't Use Headphones for Workouts
Hearing My Own Voice On Headset: What It Means & Why
Do Headphones Cause Hearing Loss: Prevent & Treat
 |
 |
 |
 |
About Simon
Simon here is an audiophile that loves to try out new audio equipment and loves to listen to different genres of music. Being an active student of Audio Electronics, He is more than capable of discussing different elements of headphones. A Powerful Music Can Change The Tone Of Your Heart, That Is The Real Power Of Music.
Thoughts on "Remove Static Noise from Headphones – For all Platforms"
 |
 |
 |
 |
Get FREE Headset Gifts now. Or latest free Music Guide from our best collections.
Disable Ad block to get all the secrets. Once done, hit any button below
 |
 |
 |
 |